
Setting Up Online Booking For Your Pharmacy
This guide was specifically developed by the BCPhA to support BC pharmacies.
This guide is meant to make things a bit easier.
Spend 30-minutes and go through this document as you setup. It will be worth it in the long run.
This system will not solve everything, but it will take care of online booking, notifications, COVID-19 pre-screening and vaccine screening. You will still get calls, but you’ll notice 40-70% of the appointments will happen on their own, those are all calls you avoided. People will show up late or even early.
There is a learning curve in getting used to a new system, so be patient and very soon you’ll be an expert!
Important system requirements
There is no software to download, everything is accessed through a web browser. It’s that easy.
There are some basic but important requirements:
- Admin features and setup should only be done on a computer. Avoid mobile devices for setup at all costs. A tablet can work, but again, not as good as using a computer. Mobiles and tablets are more for the patient’s booking experience, and you can also use it as reference in the pharmacy as well.
- You will need to use either Chrome or Safari web browser. Other browsers are not fully supported. Please also ensure you have the latest updates installed. After updating your browser, you may have to close all browser windows, restart your computer and re-open your Online Booking Platform to ensure there are no loading errors.
- You can login from a computer, tablet or smartphone. You can have more than one session open at a time, but we recommend that if two or more people are logged in at the same time only one should be making edits such as booking an appointment or filling in a form to avoid double booking or over-writing edits to a form if they are completing the same patient form simultaneously.
- You need internet access to run this application.
Table of Contents
- Important system requirements
- STEP 1: Account access and shortcuts
- STEP 2: Setting up your pharmacy
- Settings → Initial Setup
- Services
- Settings → Services
- Adding Additional Services
- Booking options
- Online Forms
- Two appointment booking feature
- Age eligibility booking criteria
- Cancellations Reporting
- Access your Waitlists
- Linking Inventory to a Service to limit bookings
- Adding Staff
- Settings → Staff
- Worktime (appointment time slots)
- Settings → Worktime
- STEP 3: Test your booking site
- Online Booking
- STEP 4: Pharmacists dashboard
- Scheduler View
- Printing your daily schedule
- Review patient booking details and screen form status
- Viewing, Printing and Saving COVID-19 and Vaccine Forms
- Reminding Patients to complete their screening forms
- Booking Status
- Adding appointments from the backend
- Adding an appointment for an individual with an email address
- Adding an appointment for a family with only one email address
- Adding an appointment for someone without email
- Cancellations and cancellations reporting
- Clients menu – Finding a patient’s appointment
- Settings menu
- Scheduler View
- Booking site links
- Block Upcoming Booking Times
- Booking site custom message block
- Managing multiple license
- Go to Settings → Staff
- Two more steps so your second staff profile will work:
- STEP 5: START MARKETING
- Online Booking
- STEP 6: MONITOR APPOINTMENTS AND GET FEEDBACK
- STEP 7: DAILY TASKS
- Getting Help
STEP 1: Account access and shortcuts
Your account setup email should have included the following:
- This setup guide.
- Read it at the same time as you are setting up.
- Share it with those who will be using the Online Booking Platform and will be responsible in setting up work hours, booking slots and workflow planning.
- Link to the admin portal.
- Save this link to your bookmarks and create as a shortcut on all the devices you will be using to access your admin portal. You will need this link often: https://b.telehippo.com/r/login
- Your vendor ID.
- You will need this when signing in each time. You can also tick “Remember Me” on the login page to save the vendor ID. If you ever forget your Vendor ID in the future, you can always see it at the end of your booking link: https://b.telehippo.com/o/VENDOR-ID
- Confirmation of your email.
- Email used to login to system.
- All booking email notifications are sent here.
- This is your login email and location of email notifications about bookings. If this is not correct, you will need to login, go to Settings --> Staff --> Pharmacist 1 --> Edit -->Email. This will impact both your login and where your internal notifications will go. You can turn off these notifications for all bookings/cancellations as well, refer to the Table of Contents (Settings menu) for page number.
- Password reset link.
- Use the Forgot Password link to setup your new password. You will get an email that acts as an email verification process as well as to setup your new password.
- We recommend changing your password for added security. Go ahead and reset your password now: https://b.telehippo.com/r/forgot_password
- Please note that the password has restrictions to make it more secure. If an error “weak password” appears please ensure you follow the password requirements and note that some symbols are not recognized e.g. you may use any of the following symbols: !@#$%^&.
- After you reset your password, it is time to do the Initial Setup. Login to the admin portal, then go to Settings → Initial Setup
STEP 2: Setting up your pharmacy
You reset your password, and now are logged in on the setup screen.
Settings → Initial Setup
Info
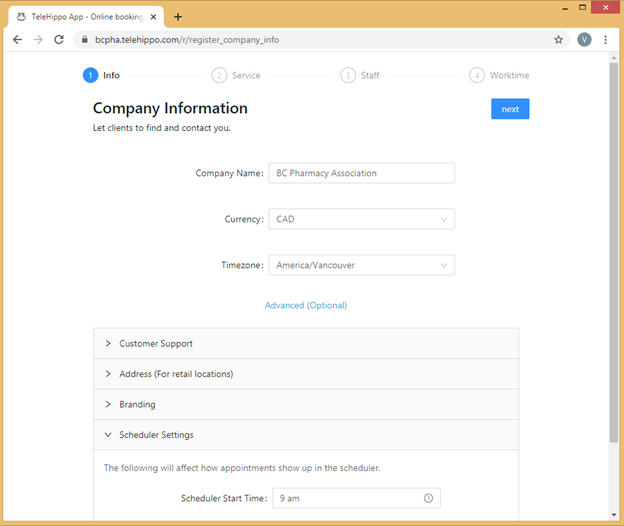
1. Company name.
a. Shows on your booking page.
b. Auto-populated on the vaccine screening forms (and other screening forms).
c. Used in automated emails and SMS texts.
2. Currency.
a. Needs to be selected but will not impact you if you do not plan to collect payment for services through this application.
3. Time zone: e.g. America/Vancouver (this is locked, if this is incorrect, please contact info@bcpharmacy.ca to update this for you before launching your Online Booking Platform as this will impact your booking slots).
4. Advanced (Optional).
a. This is an important section, not actually “optional”. Click on Advanced (Optional) to bring up important menu items.
5. Customer Support.
a. This information will appear at the bottom of your booking page.
b. The Support Email listed here is visible to your patients so they can contact you for inquiries. Adding/changing the email address here does not impact your booking confirmation emails you will receive or the login account email.
6. Address (For retail locations).
a. This information will appear at the bottom of your booking page.
b. This address will automatically appear in your automated email and SMS texts to patients.
7. Branding.
a. Your vendor ID is listed as reference. Limit 10-characters. This is not available for editing.
b. Upload your own logo. Improve branding and upload your own logo if available. This will appear on your booking page.
c. Images accepted include JPG.
8. Scheduler Settings.
a. Controls the size of the calendar patients will see.
b. Does not control booking time slots available to patients.
c. If you notice the times are cut-off in your Scheduler calendar this is where you would edit the times to expand the times that appear in your Scheduler calendar.
d. Keep clicking Next, OK and then Go to dashboard (don’t worry the Services, Staff and Worktime sections will be setup next – please continue to the section below).
Services
After the initial setup, you can always return to this area by going to:
Settings → Services
By default, there may already be a service setup as an example for you (e.g. Flu Vaccination):
The service may currently not be Online for booking for patients - if you would like to offer this, or other services, you need to click on the service → edit → Advanced (Optional) → turn on Online Booking toggle button so it is blue Save.
NOTE: If the toggle button is grey, it means that this service will not be visible to patients on your booking page.
Adding Additional Services
You can feel free to add as many services you would like at no extra cost. Click on Add Add Service when you are in the Settings → Services area.
1. Click on Advanced (Optional) to open all options.
2. Service Name: create the name of your service that will appear on your booking page for patients (this will also be included in the email notifications and SMS reminders).
3. Duration (mins).
a. Duration at 15-minutes.
• 15-minute slots x 8-hour day = 32 slots/day = 224 slots/7-day week.
• Improves chance of smooth patient flow, and better opportunity to fit minimal walk-in patients.
• If you allow for limited walk-ins, you will need ample waiting space or front shop to avoid crowding.
• Limited walk-ins can fill no shows or cancellations plus fit in between gaps of patients who show up early or arrive late, however they require a bit more juggling.
b. 10-minutes is the minimum recommended time frame.
• 10-minute slots x 8-hour day = 48 slots/day = 336 slots/7-day week.
• Good option if you have an ample waiting area plus pharmacy assistant/s or technician/s assisting with receiving and preparing patients.
• If you have too many time slots and people are late or early, you increase the chance of crowding.
c. Concurrent appointments or 5-minute intervals are not available with a single license.
• 5-minute slots x 8-hour day = 96 slots/day = 672 slots/7-day week.
• Please contact vince.lee@bcpharmacy.ca if you are interested in adding a second license to handle more time slots per hour.
4. Price.
a. If you have services that are paid you can include pricing here. Otherwise, please keep at $0 for publicly funded services.
b. If you are looking to setup online payment, you will need to setup your own Stripe account first and link it to this system to start collecting online payments directly through your Online Booking Platform (go to Settings Online Payment to Connect with Stripe).
5. Calendar Colour.
a. This controls the colour you will see your appointment bookings in the Scheduler. Assigning a difference colour for each different service will give you a quick and easy reference in your Scheduler of the type of appointments you have coming up.
Booking options
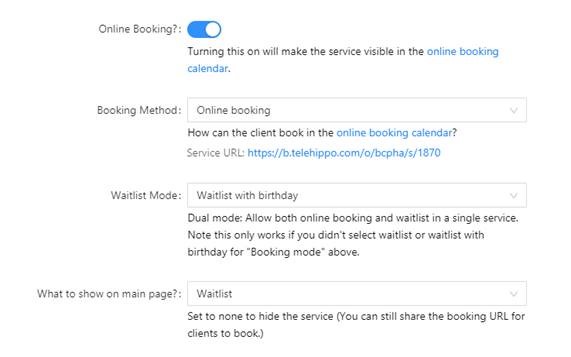
6. Online Booking.
a. Turning this on will make the service visible to patients on your online booking page. Clicking the toggle button changes it from blue i.e. on (bookable) to grey i.e. off (not visible on your booking page).
b. Services also need to be Associated with a Staff plus requires worktimes created first before patients can book an appointment on your booking site. You will get to these steps in the upcoming pages in this guide.
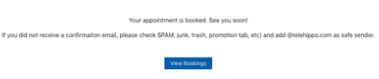
c. Once a patient books online the following notification will appear on their screen:
7. Booking Method.
a. Online booking makes the service available for booking online.
b. Call to book does not allow for online booking but instead creates a quick call button for mobile phones to dial your pharmacy’s phone number to make an appointment.
c. Online booking with Stripe Payments for services that require online payment.
d. Must have pre-authorized credit card to book online this option requires connection to Stripe.
e. Online booking via URL only hides the service from your booking site but you can still share the booking link with your patients. You would use this if, for example, you have limited supply of a vaccine and only want to open bookings to a certain number of patients. The service URL that you can share with your select patients will appear after you save the service and go to the Online Booking menu (click Copy booking link under the service name). The link will look like this: https://b.telehippo.com/o/VENDOR-ID
f. Redirect to URL is for if you would like to redirect your patients to an external booking site. Type the external site URL in the Redirect URL field below the Booking Method. Then on your booking site it will have a button next to the service “Visit site” which will redirect to a different site when clicked. This feature is not often used but is an option available.
g. Waitlist if you want to create a waitlist for a service (waitlist and age restriction features require a Premium plan). If you turn this on, you will receive an email notification each time someone joins the waitlist. This feature is to collect a running waitlist even if you happen to have other services that are accepting appointments. For example, you might have COVID-19 vaccination slots available but for those not yet eligible or cannot find a time slot that fits their schedule, they can join this waitlist. If a patient is removed from a waitlist by accident, or calls to be added to your waitlist, you can use the Add to waitlist button by clicking Settings → Services → click on service → Waitlist → Add to waitlist.
h. Waitlist with birthday restricts those who want to be added to the waitlist by their age/birth year (waitlist and age restriction features require a Premium plan). This setting must include age criteria, refer to section Age eligibility booking criteria in this guide for more information on this - ideal for services that have age eligibility criteria requirements.
8. Waitlist Mode and what to show on main page.
a. This feature requires a Premium plan.
b. This is a dual mode feature that allows patients to either do an online booking or add themselves to the waitlist in the same service (instead of having a separate waitlist for the same service).
NOTE: This will only appear, and can be used, if you didn't select Waitlist or Waitlist with birthday for Booking Method above.
c. Leave both Waitlist Mode and What to show on main page as “None” if you do not want to allow both online booking AND waitlist in the same service.
d. Waitlist Mode:
• Waitlist: if you want to activate the dual online booking/waitlist function without age criteria eligibility restrictions select this option. This feature will allow patients to book an appointment or add themselves to the waitlist for this service without age restrictions.
• Waitlist with birthday: if you want to activate the dual online booking/waitlist function with age criteria eligibility restrictions select this option. This feature will allow patients to book an appointment or add themselves to the waitlist for this service with age restrictions. This setting must include age criteria, refer to section Age eligibility booking criteria in this guide for more information on this - ideal for services that have age eligibility criteria requirements.
e. What to show on main page is the button that will appear on your booking page for patients to click:
• None: will default to button that is linked to your Booking Method selected above i.e. “book” button will appear on your booking page if Booking Method is set to Online booking or “join waitlist” button will appear on your booking page if set to Waitlist or Waitlist with birthday.
• Booking Calendar: “book” button will appear on your booking page.
• Waitlist: “join waitlist” button will appear on your booking page.
f. Example below will show “join waitlist” button on your booking page (and only allow those within the age criteria to add themselves to the waitlist as Waitlist Mode is set to Waitlist with birthday). But at the same time, you can still email the hidden service URL (below Booking Method: Online booking) to patients so they can make an appointment for this service as well. If the Service URL is not showing up, click refresh on your browser and choose the Service again and it will then appear.
NOTE: You can choose to also include the secure passcode option (refer to section Secure booking with passcode in this guide) if you want added security and are having issues with people sharing the hidden URL with people who are not on the waitlist.
9. Secure booking with passcode.
a. This feature requires a Premium plan.
b. Only use this function if you want patients to book with a passcode and they have a previously registered email address in a waitlist (this will ensure someone without the passcode and email address registered on a waitlist cannot book an appointment and gives waitlisted patients priority).
• Secure Mode: Requires password and email on waitlist for this service.
• Passcode: Type a passcode of your choice e.g. qwer1234 - something not too complicated for patients but a combination of letters and numbers.
• Waitlist: Choose the waitlist service (you can use a waitlist from another service if that is your preference).
c. After you click Save, you will see the online booking information for this service at the bottom of the page. An example of how it will appear is below:
d. Email the Booking URL (see above picture for example) to your patients on your waitlist, along with the service passcode, so they can book an appointment. To email your waitlist patients refer to section Access your Waitlists in this guide.
e. Once a patient books an appointment using the above passcode and the email address they used to be added to the waitlist, it will remove the patient from the waitlist, and they cannot book again. The following will appear for the patient when they book using the Booking URL that you shared with them:
10. No Schedule Mode.
a. No Schedule Mode Waitlist feature requires a Premium plan.
b. When there are no open appointment slots available, because all available slots have been fully booked and no more worktimes have been opened (refer to section Settings → Worktime in this guide to see how to open more appointment slots), you can choose one of the three following No Schedule Mode options:
• None: When there are no open appointment slots it will advise the patient that no appointments are currently available and to check back later i.e. no waitlist will automatically be created.
• Waitlist: If you want the system to automatically switch to a waitlist when no appointment slots are available it will pop-up asking the patient if they would like to join the waitlist for this service with no age eligibility restriction (i.e. will let anyone add themselves to the waitlist).
• Waitlist with birthday: If you want the system to automatically switch to a waitlist when no appointment slots are available it will pop-up asking the patient if they would like to join the waitlist for this service with the added age eligibility restriction (i.e. will not let anyone add themselves to the waitlist unless they meet the age eligibility criteria).
c. If the Waitlist or Waitlist with birthday is selected for both No Schedule Mode and Out of Stock Mode, the join waitlist will automatically pop-up for the patient when there are no more open appointment slots and/or no more inventory.
11. Out of Stock Mode.
a. Out of Stock Mode Waitlist feature requires a Premium plan.
b. For this feature to work, you need to create the product and add inventory - refer to section Settings Products (Inventory Control) in this guide PLUS you must also link inventory/product to the service (refer to section Linking Inventory to a Service in this guide).
c. You can choose one of the three following Out of Stock Mode options:
• None: When there is zero stock it will advise the patient that no appointments are currently available and to check back later i.e. no waitlist will automatically be created.
NOTE: It will only allow appointments to be continued to be booked when stock is 0 or less if you tick “Allow negative inventory?” use this feature with caution (refer to section Settings → Products (Inventory Control) in this guide for more information).
• Waitlist: If you want the system to automatically switch to a waitlist once the linked inventory/product is out of stock it will pop-up asking the patient if they would like to join the waitlist for this service and it will not have an age eligibility restriction (i.e. will let any age join the waitlist).
• Waitlist with birthday: If you want the system to automatically switch to a waitlist once the linked inventory/product is out of stock it will pop-up asking the patient if they would like to join the waitlist for this service and it will have an age eligibility restriction (i.e. will not let anyone join the waitlist unless they meet the age criteria).
d. If the Waitlist or Waitlist with birthday is selected for both No Schedule Mode and Out of Stock Mode, the join waitlist will automatically pop-up for the patient when there are no more open appointment slots and/or no more inventory.
12. Rank, Charge Tax, Show license, Cancellation fee, no-show fee, Short and Long Descriptions etc.
a. See on screen details for these, all self-explanatory.
Online Forms
13. Survey URL.
a. If you would like to link an external form or PDF that you have posted on your website with the confirmation email, please include a link here. We only recommend using this option if the system forms below do not meet your needs for this service.
14. Pre-screening before booking.
a. This feature turned on means that the patient needs to complete this task before they can see the appointment slots. This will appear as a pop-up question after they select this service to book and if they fail to complete, they cannot book, if they pass, they can proceed to choose a time slot to book.
• Not required (i.e. will allow patient to book without pre-screening question/s).
• COVID-19 symptom checker before booking (i.e. will require patient to complete COVID-19 pre-screening question/s before they can book).
• COVID-19 vaccination, no other vaccinations within 14 days before the appointment (i.e. will require patient to confirm they have not had any other vaccinations within 14 days before their appointment before they can book).
15. COVID-19 pre-screen within 24 hrs.
a. If you set as Require completion, the patient can make the appointment as per usual but will be prompted when they receive their email and SMS reminder (if SMS is enabled on your Online Booking Platform) a day before the appointment to complete the COVID-19 symptom checker before attending the appointment.
16. Require Vaccine Screening.
a. If you wish to activate any of the screening forms as part of the booking process, you need to switch this to Require completion.
b. Once turned on, the patient will see the screening questions immediately after they setup an appointment. We see that around 80% of patients will complete this form online immediately after when turned on.
c. You can access and view the status and the actual details of these forms when you are in the Scheduler menu by clicking on the patient’s appointment and then by clicking the “Signed/Passed/Completed/Failed” box next to Vaccine screening and the form will appear. You can click on Edit Vaccine Info to edit For Pharmacist Use Only section digitally if you choose and then click Submit.
NOTE: The Edit Vaccine Info button will only appear at the top of the form, next to the Print button, if the patient has filled out the form online. Once you fill in the form digitally and save changes your notes will be included in the form. This is an optional feature; some pharmacies may choose to print all the forms in the morning and then have the forms available for the appointments to manually write in the details when the patient is onsite.
17. Vaccine Screening.
a. No intake form (i.e. no vaccine form is required)
b. BCPhA Flu Screening Form
c. BCPhA Intranasal Flu Vaccination Screening Form
d. General Vaccine Form
e. COVID- 19 vaccination consent/screening form – AB (for Alberta)
f. COVID- 19 vaccination consent/screening form – ON (for Ontario)
g. COVID- 19 vaccination consent/screening form – BC (for British Columbia)
h. COVID- 19 vaccination consent/screening form – NB (for New Brunswick)
i. COVID- 19 vaccination consent/screening form – MB (for Manitoba)
j. COVID- 19 vaccination consent/screening form – SK (for Saskatchewan)
Two-appointment booking feature
18. Multiple appointments for same patient booked at the same time e.g. 2-doses required X days/weeks apart.
a. This feature requires a Premium plan.
b. This is the two-appointment booking feature.
c. Leave all fields blank if two-appointment booking is not required for this service.
d. No. of appts required: Enter “2” if you require patients to book two-appointments at a time (i.e. the system will require the patient to book their 2nd appointment at the same time as they are booking their 1st appointment).
e. Follow up service: select from the drop-down menu which service the 2nd appointment should be:
• If the 2nd appointment is the same service as the 1st appointment, then leave as “none”.
• If the 2nd appointment is a different service as the 1st appointment, then select the appropriate service from the drop-down menu that is required as the 2nd appointment service.
NOTE: If the service is not in the drop-down menu, you will have to create the 2nd appointment service first (Settings Services) before you can select it from the drop-down menu.
f. Min days between appts: sets minimum range for 2nd appointment.
g. Max days between appts: sets maximum range for 2nd appointment.
• For example, if appointment 2 must be 10-30 days after appointment 1 then add min days as 10 and max days as 30.
h. If you have inventory control setup (refer to section Settings Products (Inventory Control) in this guide) and a patient books a two-appointment booking the inventory will reduce by 2 units. Similarly, if you or a patient cancels a two-appointment booking 2 units will be added back to inventory.
i. If you or a patient cancels the first appointment of a two-appointment booking, the second booking will also be cancelled.
Cancelled by patient online example:
Cancelled from the backend by pharmacy example:
Cancellation email sent to patient example:
j. For two-appointment booking services only, you will also see a field called Attendance where you can export a CSV Excel spreadsheet for “Attended only one appointment”, “Attended both appointments” and “Scheduled only one appointment”:
*****
Eligibility booking criteria
19. Eligibility form criteria feature.
a. This feature requires a Premium plan.
b. For services that have specific eligibility, you can use this feature to allow only those within these specifications to make an appointment.
c. Patients will need to pass these criteria before they can make a booking.
d. Leave as “none” if you do not need this function.
e. You must first setup the form by going to Settings Forms View Add new form.
f. Enter the form name, select type “eligibility form” and enter an error message (this is the message that the patient will see if they do not meet one or more of the eligibility requirement/s) Save. To edit this information, if/when needed in the future, click Edit.
g. To add/edit criteria questions click View questions Add question.
h. Select from the drop-down menu the eligibility criteria:
• Information only: this is just a sentence/paragraph that you would like the patient to read before they book their appointment, the patient is not required to answer any questions in this section. You can use <b>bold<b> or <i>italics<i> at the end of the sentence to bold or put the sentence in italics e.g. <b> This sentence will appear in bold using the b tags at both ends.<b>.
• Yes/No: patient must answer yes to pass. You can use <b>bold<b> or <i>italics<i> at the end of the sentence to bold or put the sentence in italics e.g. <b> This sentence will appear in bold using the b tags at both ends.<b>.
• Age OR Birth Year: same as the age / birth year mode control (refer to section Age eligibility criteria feature in this guide). If you use an eligibility form that includes age or birth year criteria, the age / birth year mode module will be overridden. If you don't use an eligibility form that includes age or birth year criteria, you can still use the age / birth year mode module i.e. if you add the age or birth year in the eligibility form you will not need to input the age or birth year in the age / birth year mode module as well.
• Eligibility: you can tick 1 or more sectors/fields in this section for those who are eligible. The patient must select one of the eligible sectors/fields to pass.
• Rank: this is for arranging the order of the question/s. Rank 1 question will be asked first, rank 2 question will be asked second, rank 3 question will be asked third etc.
i. Once you finish creating the form, go back to Settings Services select service edit Advanced (Optional) select Eligibility Form you just created from the drop-down menu Save.
20. Age eligibility criteria feature.
a. This feature requires a Premium plan.
b. For services (e.g. COVID-19 vaccinations) that have moving age eligibility, you can use this feature to allow only those within a specific age range to make an appointment.
c. Patients will need to pass this criterion before they can make a booking.
d. Age criterion may be based on birth year or date of birth which includes month and day.
e. Leave blank if you do not need this function.
EXAMPLE Birth Year (with no maximum): If eligibility is for people born in or before 2009 then setting will be:
NOTE FOR BIRTH YEAR vs AGE MODE:
Birth Year mode is based on year of birth so for the above Birth Year Example, if they were born in 2010 or after, they would not be eligible i.e. the system would allow them to book an appointment as long as they were born in or before 2009 no matter what their birthdate in 2009 (or before) is.
EXAMPLE Birth Year (with a range): If eligibility is for people born between 1950 to 2010 then setting will be:
EXAMPLE Age (with no maximum): If eligibility is for people 12 years or older then setting will be:
NOTE FOR BIRTH YEAR vs AGE MODE:
Age mode is based on birthday date so for the above Age Example, if their 12th birthday has not yet passed, they would not be eligible i.e. the system would not allow them to book an appointment until the day of, or after, their 12th birthday.
EXAMPLE Age (with a range): If eligibility is for people 12 - 85 years then setting will be:
21. Click Save at the end to apply all changes.
IMPORTANT NOTE: DO NOT just click outside of the window, your window will disappear, and any changes you made will not be saved.
Cancellations Reporting
If you or your patients cancel any appointments for a service, you will be notified by email immediately:
1. These notifications can be turned off/on by going to Settings System Settings BCC all booking emails?: turn off/on blue toggle button Save.
2. If you wish to see a detailed report on cancellations of a service, you can download a cancellation report in Settings Services select the service, hover over the 3 dots next to edit and then click Cancellations (see example below).
NOTE: If you or your patients have not cancelled any appointments for this service the report will be blank.
3. This report is available as a Comma Separated Values (.CSV) file by clicking on Export CSV if you would like to view it as a spreadsheet.
Access your Waitlists
1. This feature requires a Premium plan.
2. You will receive an email notification each time someone is added to a waitlist. These notifications can be turned off/on by going to Settings System Settings BCC all booking emails?: turn off/on blue/grey toggle button Save.
3. The Waitlist button can be seen in the above image:
a. If no one has been added to the waitlist for this service, then the report will be blank.
b. If you have multiple services, you need to go into each service that has a waitlist to access the individual waitlist for that specific service.
4. Calling patients:
a. If you plan to make phone calls to your waitlist patients and manually book them into available time slots, the default view (after clicking Waitlist) will give you all the information you need and there is no need to use the Export to CSV button if you do not wish to.
b. After booking the patient, ensure to go back to the service, click Waitlist button and click on Remove to take them off the waitlist (to remove one-by-click Remove in that patient’s row or to remove multiple patients at once use the tick box for all patients that apply, click on 3 dots next to Action and click Remove.)
5. Mass email to patients on waitlist.
a. The Export to CSV function is for you to export the waitlist as an Excel spreadsheet to do a mass email blast from your own email system. You can either click the Export to CSV button to export all names on the waitlist OR use the tick box for all patients that apply, click on the 3 dots next to Action and click Export (e.g. you may only have 30 vaccines in stock so you may only want to email the first 30 patients until more stock arrives).
b. Email everyone on the list either by integrating into your existing email system (see Setup email merge section below) or you can send a bulk email to everyone with the BCC field. DO NOT send a bulk email where you include everyone’s email in the To field or CC field of the email otherwise all your patients will be able to see all the email addresses.
c. You do not have permission to send other marketing information for other services. Please refer to Canada’s Anti-Spam Legislation.
d. You can only send emails relevant to the service appointment waitlist they have joined once you have more appointment time slots available.
e. The file includes name, phone number/s, email, date of birth, service URL and unsubscribe URL links for that service’s waitlist.
NOTE: If you edit patient information in this waitlist section it will only change their information on this specific waitlist and it will not change their profile information in the Client section. You can only update patient information on the system in the Clients menu.
f. Before sending the email:
• Ensure you have opened more timeslots so your patients can book an appointment - refer to section Worktime in this guide.
• If you have inventory control (this feature requires a Premium plan) ensure you have inventory in stock – refer to section Settings Products (Inventory Control) in this guide.
• You may want to temporarily hide the service from your booking site, or use a passcode, to avoid non-waitlist patients from booking before your waitlist patients have a chance to book an appointment - refer to sections Booking Method (Online booking via URL only) and Secure booking with a passcode in this guide.
g. In your mass email to patients include:
• A link to your booking site (i.e. service URL listed in your CSV Export Excel spreadsheet) with a note to patients asking that they DO NOT SHARE THIS BOOKING LINK.
• Name of service/waitlist they have joined.
• Your business information.
• A note that highlights appointments may be limited and offered on a first come, first served basis.
• That they will now be removed from the waitlist and if they are not able to make a booking to be sure to join the waitlist again to be notified of any future appointments.
• If you are using the “secure booking with passcode” feature for your waitlist/s (refer to section Secure booking with passcode in this guide) you must also include the unsubscribe URL link (that appears in two locations: at the top of your waitlist as shown below and in the CSV Export Excel spreadsheet) so the patient can unsubscribe themselves from the waitlist if they no longer want an appointment. This of course relies on the patient to click on the unsubscribe link to remove themselves from the waitlist. Each service waitlist has a different link so when your patient clicks on this link for this service it will only remove them from this specific service’s waitlist i.e. it does not remove them from any other service waitlist that you may have created that they may also have been added to.
NOTE: If someone on this waitlist ends up making an appointment for this specific service, they will automatically be removed from the waitlist as long as they are using the same email address listed on the waitlist and you are using the same service profile (i.e. you do not have two service profiles for the same service e.g. “Service ABC Waitlist” separate from “Service ABC”).
h. Save this file on your computer.
i. Setup email merge (if you do not use the BCC method explained above).
• Outlook users mail merge instructions on how to send bulk email message:
https://support.microsoft.com/en-us/office/use-mail-merge-to-send-bulk-email-messages-0f123521-20ce-4aa8-8b62-ac211dedefa4
• Google users mail merge instructions on how to send bulk email message:
https://developers.google.com/workspace/solutions/mail-merge
• PAID service:
https://mailchimp.com/pricing/
j. If you are using the “secure booking with passcode” feature for your waitlist/s (refer to section Secure booking with passcode in this guide) then do not do the following step until you have given your waitlist patients time to book an appointment otherwise it will not allow them to book if they have already been removed from the waitlist: after sending the mass email, and you are ready to patients from your waitlist, go back to the service, click the Waitlist button - to remove ONE-BY-ONE click Remove in that patient’s row OR to remove MULTIPLE patients at once use the tick box for all patients that apply, click on the 3 dots next to Action and click Remove OR to remove ALL patients from the waitlist click Empty waitlist to clear it completely and start fresh. If a patient is removed from a waitlist by accident, or calls to be added to your waitlist, you can use the Add to waitlist button.
Linking Inventory to a Service to limit bookings
1. This feature requires a Premium plan.
2. You need to link inventory to the service for it to start tracking - inventory will deplete by one unit each time someone books that service (or two units if a two-appointment booking is made) and replenish the stock if an appointment is cancelled by either the patient or the pharmacy.
3. To link a product to a service, go the Settings Service and then select the service.
4. Scroll to the bottom of the screen and click on Associated Products Edit
5. Select the product from the drop-down menu and click Add. If the product is not listed yet, create the product first – refer to section Settings Products (Inventory Control) in this guide.
Adding Staff
After the initial setup, you can always return to this area by going to:
Settings → Staff
By default, one staff account will already be created e.g. Pharmacist 1 or Pharmacist Team
Nothing needs to be touched here unless you need to add a second license.
There is a $15/month fee per additional license. Contact vince.lee@bcpharmacy.ca to setup additional licenses.
If you have multiple licenses refer to section Managing multiple licenses in this guide.
Worktime (appointment time slots)
After the initial setup, you can always return to this area by going to:
Settings → Worktime
Adding Shifts (time slots)
You can adjust worktimes in the pharmacist dashboard under Settings Worktime.
1. You need to click on the white, blank space/box that is in-line with the pharmacist and day of the week then a pop-up window will appear for you to edit.
2. Repeat? You may choose to auto-populate multiple weeks/months at once by selecting repeated weekly until specific date in the drop-down menu. Do not use the repeated weekly forever function as this will open bookings forever and likely result in you needing to cancel a lot of appointments in the future plus patients may accidentally book an appointment for the wrong year not realizing they have selected a date in 1+ years in the future. We recommend that upon initial launch of your booking platform to only accept appointments for the first 2-4 weeks to test it out and then gradually open more time slots as you get use to the system and how it works for your pharmacy.
3. Repeat steps 1 and 2 above for each day of the week that you would like appointment to be available,
4. If you need to edit a time slot, just click on the time (e.g. 9:00am-5:00pm in blue in the example above) and the "Add a shift" window will pop-up again, make your changes and then click Save.
NOTE: If a patient has already booked an appointment within the time slot that you have just edited, it will not automatically cancel / delete their appointment. The only way to cancel / delete an appointment is by clicking an appointment in your Scheduler and click Cancel or if your patient cancels it online themselves.
5. If you have a block of time that you do not accept bookings, just add two time slots (e.g. you offer between 10-1pm no bookings from 1-2pm and then again 2-4pm you would add two shifts one from 10am to 1pm and then one from 2pm to 4pm). To do this, click "Add Another Shift" in the "Add a shift" window.
6. Before launching your Online Booking Platform and sharing your booking link, we highly recommend creating some test time slots on days that you aren’t taking bookings yet so that you can do a full test of your booking site. This will also allow you to see how it will appear to your patients. Refer to section Test your booking site section in this guide for more information on this.
7. Note: If you type a note in this field it will appear on the pop-up just before a patient makes a booking. We recommend adding a note about COVID-19 pre-screening or any other note you would like highlighted to the patient whenever they book any service your pharmacy has listed on your booking page.
8. Deleting Worktimes - If you need to adjust the worktimes, you can click on the shift, click Delete and then choose to either delete this shift only or delete all upcoming shifts going forward for that day of the week i.e. if you clicked on a Wednesday shift it would then only delete Wednesday shifts moving forward and not all shifts every day of the week. To delete different days of the week you will need to click on each day of the week individually.
9. Plan for statutory holidays - be sure to go through your calendar of shifts you have setup and delete statutory holidays if you are closed on those dates. Or, if you have specific hours of operation during statutory holidays you need to ensure you adjust those worktimes for those dates before a patient makes a booking for that time slot.
STEP 3: Test your booking site
Online Booking
- Click Go to online booking page.
- You can access your booking link by clicking the Online Booking menu (the very last item under “Online Payments”.
- You can click Copy booking link under All services for your online site that lists all your services, or you can click Copy booking link under a specific service for the link to that service only.
- Open an incognito browser page by pressing CTRL+SHIFT+N on your keyboard and then paste the copied link to view your online booking site.
- You can access your booking link by clicking the Online Booking menu (the very last item under “Online Payments”.
- Make sure the following are correct on your new booking site:
- Services available are correct.
- Time slots and short descriptions are correct.
- Logo on the top looks OK.
- Address, phone, email and your website address at the bottom of the page.
- Choose the service by clicking the Book button (or Waitlist if applicable) and then confirm the long description is correct. Do this for each service if you have multiple services listed.
- The name of the pharmacist is displayed correctly.
- Make some practice bookings as if you are a patient. Fill up the test time slots that you setup.
- An email is sent right away to the “fake patient” as well as to your pharmacy. So, we recommend testing some with your own personal email address/addresses so you know what experience your patients will have (do not use your pharmacy’s email address) and also make some additional bookings by creating fake email addresses ending with @bcpha.ca as that is the domain for the BC Pharmacy Association and no one will actually receive the confirmation email but it will give you a chance to do more testing particularly so you can see how the Scheduler section of your Admin portal works.
- A text message is sent 24-hrs before the appointment (if your Online Booking Platform subscription has SMS activated (refer to section Reminding Patients to complete their screening forms in this guide for more information), so please also be mindful if you intend to put a phone number, we recommend using a fake phone number e.g. 7777777777 so it doesn’t actually go anywhere. You can also test some practice bookings with a real phone number as well if you would like to see what the SMS looks like. Remember, SMS is only sent 24-hrs before the appointment and not immediately by default.
- Fill in the vaccine form for some of the test bookings plus skip the vaccine forms for some of the test bookings.
- Fill in the COVID-19 pre-screening forms for appointments coming up in 24-hours.
- Read your sample email that is sent to your admin account.
- Once you are done, you are ready to test the Scheduler and other admin features of your booking platform.
STEP 4: Pharmacist’s dashboard
Login to the admin page again if you are not already there: https://b.telehippo.com/r/login
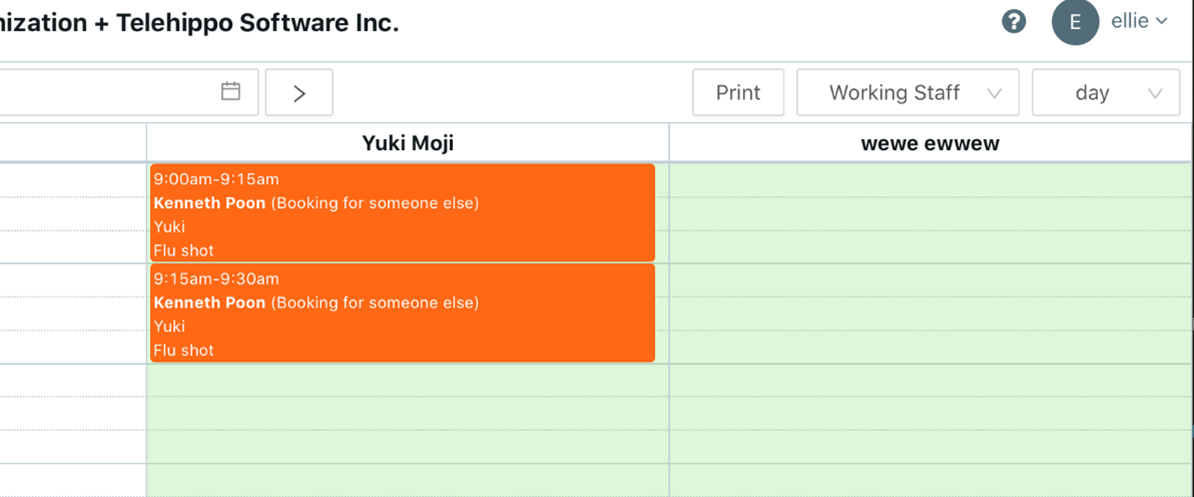
Scheduler View
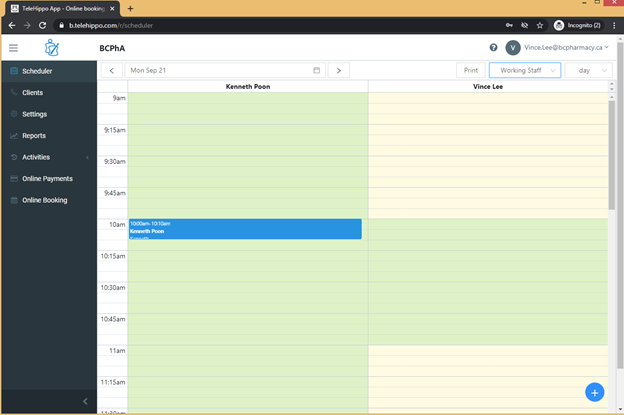
Default view
- This is your default screen when you login.
- It is set to All Staff and on day view.
- You can also view in week view or working staff if you decide to also setup consultation rooms for the service/s and organize in that level of detail as well.
- You can also toggle through your calendar with the arrows or drop-down icon.
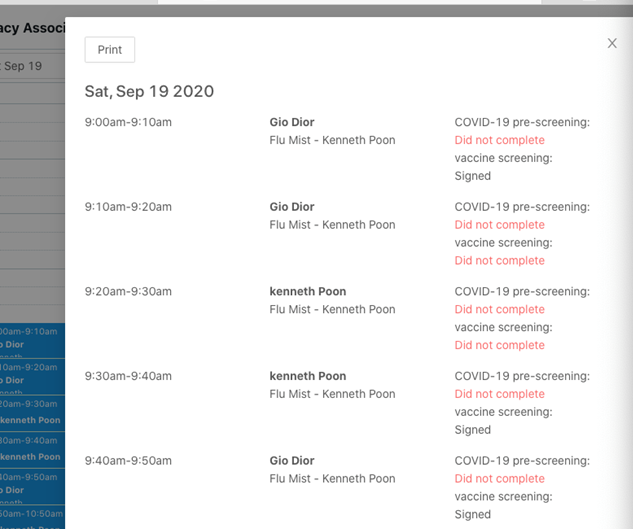
Printing your daily schedule
In the Scheduler on day view, you can click the Print button to save as PDF or print on paper everyone scheduled for that day selected. The Print button will only appear if at least one person has an appointment booked that day. If you want to print other days, you need to go to toggle through your calendar with the arrows or drop-down icon and then click Print.
NOTE: Someone may book after you have saved/printed the schedule so you may not want to print the schedule too far in advance.
PRINTING: Some browsers will not print the information on a letter sized paper by default. In that case, you need to choose in your printer settings to select letter sized paper and to shrink to fit page.
Review patient booking details and screen form status
There are two ways to review a patient’s booking:
- In Scheduler view: find the patient and click on their appointment.
- In Clients menu: search for the patient’s name, email or phone number. Then click on their name once it appears. If it does not appear it means they do not have a profile on your system yet.
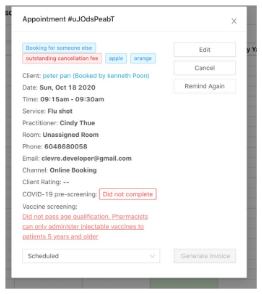
Once you open their appointment, you will see this screen:

Click on the screening form box e.g. “Passed” or “Did not complete” to bring up each screening form.
Viewing, Printing and Saving Screening Forms
- After clicking on “Passed”, “Signed”, “Did not complete”, “Failed” you will see the actual form pop-up.
- You can Print the form as a PDF here.
- You can click on Edit Vaccine Info to edit For Pharmacist Use Only section digitally if you choose and then click Submit.
NOTE: The Edit Vaccine Info button will only appear at the top of the form, next to the Print button, if the patient has filled out the form online. Once you fill in the form digitally and save changes your notes will be included in the form. This is an optional feature; some pharmacies may choose to print all the forms in the morning and then have the forms available for the appointments to manually write in the details when the patient is onsite.
Reminding Patients to complete their screening forms
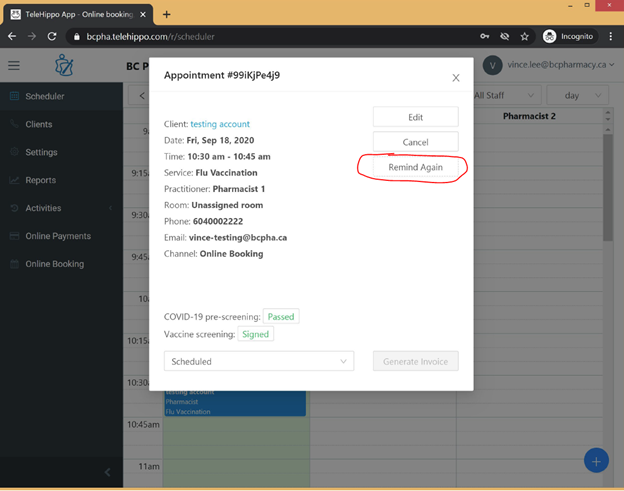
- By default, the patient will receive an email immediately after they book an appointment to direct them to complete their screening forms before their appointment.
- They will also receive an email (and SMS text notification if enabled on your online booking subscription) automatically 24-hours before the appointment.
- If you notice they have not completed both or either screening forms the morning of their appointment, open the individual patient’s booking in Scheduler and click on Remind Again.
- Choose Notify by Email or Notify by SMS.
NOTE: If SMS is enabled for your Online Booking Platform subscription, there is a maximum of 300 SMS per month. It will cost an extra $15/month for any overages, and this will give you access to an additional 300 SMS for that month.
- Choose Notify by Email or Notify by SMS.
Booking Status
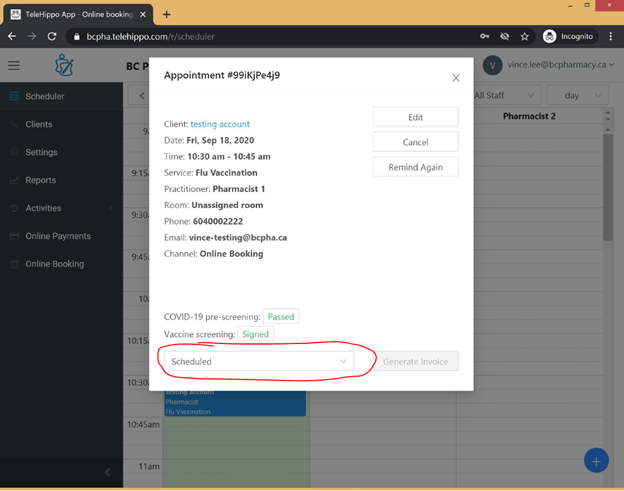
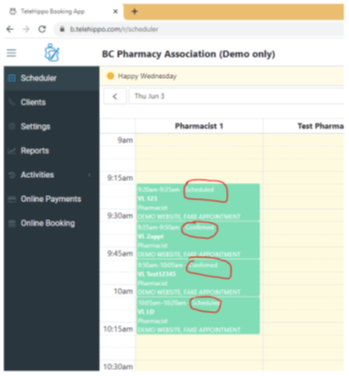
- After a booking has been made, the appointment is noted as Scheduled (this can be seen in the example above and by going to Scheduler and then clicking on an appointment):
- This is an optional feature to track if someone called to confirm their appointment if you wish to take that extra step above and beyond the screening forms.
- You can track as Scheduled (which is automatic and the default setting when an appointment is booked), Confirmed, Arrived or No Show.
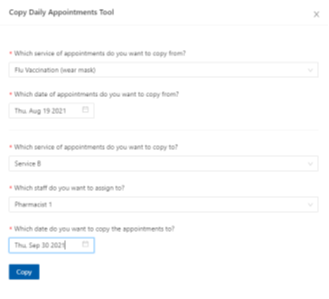
Copying appointments
1. If you want to bulk copy appointments (e.g. dose 1 patients can now book their dose 2) then go to Scheduler → toggle through your calendar with the arrows or drop-down icon until you find the day you would like to copy appointments from → click 3 dots next to Print button (this button only appears on days that have at least one appointment booked) → click Copy and enter the details (example below):
a. This feature will not delete or remove the original appointments you are copying from, it will simply copy and paste to a different day but keep the original appointments as well.
b. You can copy service of appointments to the same service you are copying from (just select the service you wish to copy from/to in the drop-down menus).
c. The date you are copying from is defaulted to the day you were in your Scheduler when you selected Copy.
d. You will have to complete these steps for each staff (i.e. if you have multiple staff with appointments on the same day you can only copy from one staff at a time).
e. Copy the appointments to the same day of the week (i.e. if the original appointments were on a Wednesday, then copy the appointments also to a Wednesday). This way when you copy another set of appointments it will keep the copying consistent, easier to track and less likely to copy it to a day that you have already copied to.
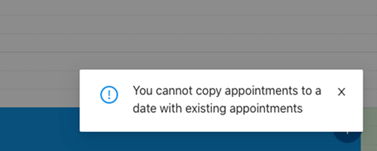
NOTE: Copy feature will warn you if there are existing appointments on the day you are copying to as seen in example below.
f. You will notice that the appointments are copied over identically for each person and in the exact same time slot.
g. The copy appointment feature will not automatically email the patient. Once you have copied the patient’s appointments to another day go to that day in your Scheduler, click on each appointment and call each patient one-by-one to confirm their appointment over the phone.
• Once they confirm, change their status from “Scheduled” to “Confirmed” so you know they have been contacted to confirm their appointment. “Scheduled” to “Confirmed” will appear in your Scheduler as seen in the example below.
• If they prefer another date click Edit, choose the new date and/or time then click Update appointment.
• Then click the Remind button so they receive the email confirming their appointment date and time as well as asking to complete their screening form/s. They will also receive a reminder automatically by the system 24-hours before their appointment based on your system settings in Settings Scheduled Reminders & Notifications Booking Reminder (click edit if you would like to change the notification mode for the 24-hour reminder). Refer to section Settings Scheduled Reminders & Notifications in this guide for more information on notification mode.
h. If they confirm over the phone that they are not interested in the appointment, then click Cancel to cancel the appointment. If you prefer, there is no need to notify the patient via email on the cancellation in this case as you have already spoken to them over the phone to confirm their cancellation.
*****
*****
Exporting appointments
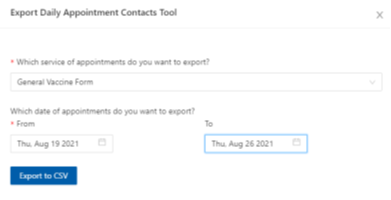
- If you want to export appointments to a CSV Excel sheet to see how many appointments are in a given date range (can export up to 7 days maximum per export) and will list name, phone number, email address, service, appointment start time, product (if applicable) and status e.g. scheduled/confirmed/arrived/no show go to:
- Scheduler → toggle through your calendar with the arrows or drop-down icon until you find the day you would like to export appointments from → click 3 dots next to Print button (this button only appears on days that have at least one appointment booked) click Export and enter the details (example below):
- You will have to complete these steps for each service on that day (i.e. if you have multiple service appointments on the same day/s you can only export one service at a time).
- Select the dates you would like to export from/to.
- This will simply export the appointments to a CSV Excel spreadsheet for an easier view of your appointments for a given date range, it does not remove the appointments from your Scheduler.
*****
Deleting appointments
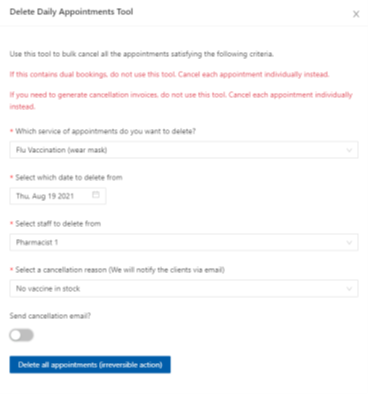
If you are sure you want to bulk delete appointments, go to Scheduler → toggle through your calendar with the arrows or drop-down icon until you find the day you would like to delete appointments from → click 3 dots next to Print button (this button only appears on days that have at least one appointment booked) → click Delete and enter the details (example below):
- The date you are deleting appointments from is defaulted to the day you were in your Scheduler when you selected Delete.
- You will have to complete these steps for each service and each staff (i.e. if you have multiple service/s and multiple staff with appointments on the same day you can only delete one service and one staff at a time).
- Select a cancellation reason (refer to section Cancellations and cancellations reporting in this guide to add/edit Cancellation Reasons). The reason will also appear in the email notification sent to the patient if you have the Send cancellation email? toggle button on (blue). Click it to off (grey) if you do not want the cancellation email sent to patients.
- Click Delete all appointments (irreversible action).
- Cancellations and deletions (along with all other tasks) completed by staff will be listed under Activities → Staff (refer to section Cancellations Report in this guide for more information on Activities).
Adding appointments from the backend
Adding an appointment for an individual with an email address
1. There are two ways in Scheduler view to add appointments:
a. Click on the specific time slot that is blank and ensure that a staff member is working that time (green in the calendar means that staff is working, yellow means they are not added to the worktime for that day and time slot).
b. Or you can click on the + button at the bottom right corner.
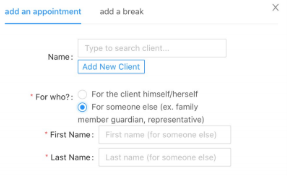
2. Fill in all the details in the add an appointment pop-up window:
a. Select the service they would like to book from the drop-down menu.
b. If the patient already exists in your Online Booking Platform client list just start typing their first and/or last name/s in the “Name” field and their name will appear for you to click on.
c. If the patient does not already exist in your Online Booking Platform client list, you will need to click Add New Client before booking an appointment for them – this is most likely required in most cases if a patient is asking you to book an appointment for them on their behalf. You are only required to enter the information in the first tab called Basics and leave the other tabs blank and click Save.
3. Once all details are completed in the add an appointment pop-up window click Add Appointment.
4. Find the booking in Scheduler and click on it to open.
5. Click on Remind and then Notify by Email. This will send the patient a notification email confirming their appointment and remind them to complete their screening form/s.
6. When speaking to the patient, let them know:
a. To expect an email to complete the vaccine screening form (ask them to check their junk folder just in case it is inadvertently sent to junk mail).
b. They will need to use the Forgot password feature to setup their password to log in online to complete their screening form/s.
c. They will need to complete the COVID-19 screening form 24-hrs before their appointment and will receive another reminder email plus SMS reminder (if your Online Booking Platform subscription has SMS enabled) 24-hrs before their appointment.
Adding an appointment for a family with only one email address
1. Booking on behalf of: If they have a family member who is also booking an appointment who does not have email or phone, the family member with an email address can book other family members on their behalf using the same account:
a. Choose a booking slot (you will see two options):
b. Each appointment will have their own screening forms.
c. After it is booked, it shows in the appointment pop-up window “Booking for someone else” tag (see example below) so you know that the patient was booked on behalf of another client.
d. The booking module will show the patient's name e.g. Peter Pan (Booked by...) as per example below:
2. (Booking for someone else) text can also be seen in the Scheduler view (see example below):
a. Clicking on the appointment will also show a blue tag saying "Booking for someone else". The consent form can be click on in the appointment pop-up window to see the details. The client information in the pop-up window will still show the information of the person who booked the appointment on the patient’s behalf, but the consent form will be the information that the client filled in on behalf of the patient. If the patient filled in the incorrect information, you cannot edit this online on their behalf for compliance reasons, so you will need to print the form and add manual edits on the paper copy and ask that the patient initial the changes when they come for their appointment.
b. Print form will also show "Booking for someone else" (see example below).
Adding an appointment for someone without email
If a patient does not have an email address, they are not able to complete the online forms themselves. However, you can still create their profile and book them into a time slot in your Scheduler calendar manually if you would like to ensure their time slot is booked for them. To do this refer to section Adding appointments from the backend in this guide***the major difference is that for the email address section, it is recommended to create a fake email address ending with @bcpha.ca e.g. johnsmith@bcpha.ca and then add a note that the patient does not have email and / or text messaging service as per example below:
Cancellations and cancellations reporting
1. Patients can cancel appointments themselves online. You will receive an email notification if that happens.
2. If they call you to cancel, you can either:
a. Find the day and time of their appointment in the Scheduler menu, click on their appointment, click Cancel and select the cancellation reason.
b. Or by going to the Clients menu, use the search tool to find their name, click on the row with the appointment they would like to cancel, click Cancel and select the cancellation reason.
• To add / edit cancellation reason/s and customize messages to patients, go to Settings → Cancellation Reasons → Add new reason or click on an existing reason to edit it.
3. When you cancel an appointment, this pop-up will appear:
4. Then you can choose either to send an email, SMS (if your Online Booking Platform has SMS enabled), or to not notify.
SAMPLE OF EMAIL
Dear [name],
[Custom Cancellation Reason Message]
Appointment: [Service name]
Start Time: [Date and time of appointment]
Please call the vendor back or visit https://b.telehippo.com/o/bcpha if you wish to check for availability and to make another appointment in the future.
Thank you for using our online booking service. Look forward to seeing you again in the near future.
Sincerely,
[Your business name]
Tel: [Your phone]
[Your address]
Booking by BCPhA + TeleHippo
Cancellations Report
You can view general cancellations data in the Activities section of the Dashboard (along with all other tasks completed by both staff (e.g. adding a client or updating a service) and clients (e.g. booking an appointment online or completing a screening form online).
1. If the appointment was cancelled by the pharmacy, choose:
a. Activities → Staff
b. Type “cancel” in the search box to show cancelled appointments by staff.
c. Or type “delete” in the search box to show deleted appointments by staff.
2. If the appointment was cancelled by the patient, choose:
a. Activities → Clients
b. Type “cancel” in the search box to show cancelled appointments by patients.
3. FULL REPORT:
a. Settings → Services and select the Service.
b. Click on the 3 dots next to the edit button and then click Cancellations.
c. You can view and export all the cancellations data for that specific service including email addresses if needed by clicking Export CSV button.
You can also view the waitlist for that specific service in this section (waitlist feature requires a Premium plan). Refer to section Access your Waitlists in this guide for more information. If a patient is removed from a waitlist by accident, or calls to be added to your waitlist, you can use the Add to waitlist button by clicking Settings → Services → click on service → Waitlist → Add to waitlist.
Clients’ menu – Finding a patient’s appointment
If a patient calls to check their appointment date and time as they forgot when they booked, then this feature is an excellent search option:
1. Click on Clients menu
2. Use the search feature at the top to find patient’s name and to open their bookings.
a. Search by name, email, or phone number
3. After locating the patient, click on their name to view their:
a. Profile – IMPORTANT this is the only area that you can edit their profile information permanently. If you edit their information in their appointment slot only it will not update the client’s information in their profile.
Use this edit button in Client menu to update patient information:
Do NOT use this area to edit patient’s information if you want to permanently update their profile:
b. Appointment history - if you click on one of their appointments, a window pop-up will appear for you to view and edit the appointment date/time if needed (example seen above). If the patient forgot their appointment time, click on Remind and send them a reminder email so they have it in their email for reference. This email will also include the screening form/s required to be completed before their appointment.
4. You cannot delete client profiles; however, you can remove most of the details on profiles if you have a lot of fake/test accounts or if a patient has asked for their information to be removed from the system. You can also rename them as zzzzzTest account only for example and by doing this these accounts will appear at the bottom of your client list.
Settings menu
Settings → Staff
- You can adjust what services are offered by each staff listed in this menu.
- If you only have one license you will see one staff listed.
- By associating a service to a staff, that service will be available for booking online automatically for that staff.
- You can change the staff name what services they offer and primary email by clicking on the staff name and then clicking edit (the primary email is linked to the Role “Owner” and can be seen under Profile when you click on the staff name).
5. If you require multiple licenses, please contact vince.lee@bcpharmacy.ca, the cost is $15/month per additional license.
6. If you have multiple licenses refer to section Managing multiple licenses in this guide.
Settings → Worktime
You can adjust your worktimes using this menu. Refer to section Settings Worktimes in this guide for more information.
Settings → Services
You can add/edit your services using this menu. Refer to section Settings Services in this guide for more information.
Settings → Rooms
Best used if you have multiple licenses on your account and each staff has a designated room. Not in use for single license accounts. You may add multiple rooms by clicking Add new room.
Settings → Payment Methods
This can be used for generating invoices. You can click Add payment method and type the name of payment method e.g. credit card, debit card, direct billing, cash. Refer to section Settings → Online Payments in this guide for more information.
Settings → Tax
This changes tax settings for invoices.
Settings → Cancellation Reasons
Add and/or edit cancellation reasons to keep track for why people are cancelling appointments. Click Add new reason or click on a reason listed to edit an existing reason.
Settings → Scheduled Reminders & Notifications
Booking Confirmation
This controls how the patient is notified when they first make the booking online. This is sent automatically to anyone that makes a booking online more than 24-hrs in advance.
Appointments you enter from the backend will not receive this booking confirmation email, you need to send it manual by opening their appointment and clicking on Remind.
You can choose email, SMS (if your Online Booking Platform SMS is enabled) or none.
Booking Reminder
This controls the reminder that is automatically sent 24-hrs before their appointment. These reminders are sent automatically for backend bookings as well, as long as the appointment was entered in your Scheduler more than 24-hours ago. The options for notifications are:
a. None
b. Notify by email (only)
c. Notify by SMS (only) - if your Online Booking Platform SMS is enabled
d. Notify by SMS first (if SMS can’t be sent then system will email) - if your Online Booking Platform SMS is enabled
e. Notify by email first (if email can’t be sent then system will send SMS) - if your Online Booking Platform SMS is enabled
f. Notify by both email and SMS (will send both email and SMS) - if your Online Booking Platform SMS is enabled
Settings → Cancellation Policy
Set cancellation policies here e.g. collect online payments for no-shows (requires Stripe – refer to section Settings Online Payments in this guide for more information on online payments).
Settings → Notification
System wide notification to communicate with your staff. This will show at the top of your screen in a yellow bar. This will not be seen by patients on your booking page.
Settings → Online Payments
If you are looking to setup online payments, you will need to setup your own Stripe account first and link it to this system to start collecting online payments directly through your Online Booking Platform (go to Settings Online Payment to Connect with Stripe).
Settings → System Settings
1. Turning off emails sent to your admin email address: by default, you receive an email notification by BCC of every booking/cancellation email that is sent to your patients who book/cancel an appointment online. If you would like to turn this off, click the BCC toggle button so it turns from blue (on) to grey (off) then click Save.
2. Scheduler View: by default, when you open your Scheduler, it will show you All Staff accounts whether they have a worktime or not. It is recommended to not use Working Staff view.
Settings → Products (Inventory Control)
This section is for inventory control.
1. This feature requires a Premium plan.
2. Click Settings → Products → View.
3. Add/edit products and inventory here.
4. To add a new product click Add product.
5. To edit an existing product, click on product → edit → make changes → Submit.
6. Then go to Settings → click on Service of choice to link the inventory → scroll down to Associated Products → edit → select product from drop-down menu → Add.
7. Only click “Allow negative inventory?” if you are OK for patients to continue to book appointments even when stock goes to 0 or less – use this feature with caution and only if you are watching your new stock arrival/new appointment bookings closely to avoid out-of-stock issues on days appointments were scheduled.
8. Inventory will deplete by one unit each time someone books that service (or two units if a two-appointment booking is made) and replenish the stock if an appointment is cancelled by either the patient or the pharmacy.
9. To view the inventory history for a particular product (example seen below), go to Settings → Products → View, click on the 3 dots next to edit → History
*****
Settings → Forms
This feature requires a Premium plan. For services that have specific eligibility, you can use this feature to allow only those within these specifications to make an appointment. Refer to section Eligibility form criteria feature in this guide for more information.
Booking site links
Go to Online Booking
1. You can access your online booking link for All services or individual links for each specific service. All services link is at the top of this page and each link for each individual service are listed below. The number of links listed depends on how many services you have. Click “Copy booking link” and paste in an email, website, social media account or display in your pharmacy for patients to use for booking online.
2. In this section you can also click View instructions for quick instructions and links to different sections of the system e.g. setting services to bookable online, setting staff bookable online, associating staff to services offered, entering worktimes to open up appointment slots.
Booking site custom message and restricting booking times
- Go to Online Booking → Change settings → Scheduler Message: type in the text box to add a custom message that will appear in a blue box at the top of your booking site for patients to read.
- Go to Online Booking → Change settings → Block same day bookings prior to?: Don’t want to allow for bookings that are same day or just 2 hours from now? You can use this automated feature to block out upcoming shifts based on time. Block spots that are coming up in 24-hours from now (by inputting 24), 12-hours from now (by inputting 12) or just 1-hour in advance (by inputting 1), whatever your preference. By default, it is set to 0 which allows bookings to be made any time with no cut-off times. To prevent same day booking input 10000.
- Click Save after making any changes.
Managing multiple licenses
Go to Settings → Staff
The main account will have the Role of “Owner”.
For your additional users you can click on them and then click edit → Advanced (Optional):
1. Email: Additional staff email addresses need to be entered here and must be different from the main account’s email address. Once you add the email address you can have your staff go to the admin login page https://b.telehippo.com/r/login and click Forgot Password to setup a password.
2. First and Last Name: Enter either specific staff name or generic e.g. “Pharmacist 2” or “Other Staff”.
3. Details → Role (drop-down menu):
4. Login Info: needs to be enabled (i.e. toggle button is blue) so this staff member can login themselves and gain access as per their role noted above (if disabled, they will not be able to login using this account).
5. Online booking:
a. Is Bookable?: You need to enable booking via scheduler (i.e. toggle button is blue) so that they can be booked from the backend if applicable (refer to section Adding appointments from the backend in this guide for more information on backend appointments).
b. Accept Online Bookings? You need to enable booking via online bookings (i.e. toggle button is blue) so that they can be booked online by patients on your booking site (if applicable).
c. Rank: The order that this staff member will appear in your scheduler and online booking. 1 will show first, 2 will show next etc.
d. Click Save after making any changes.
Two more steps so your second staff profile will work:
1. Add Services to their account, which should be on the screen below “Profile” after clicking Save. If you do not see Offered Services at the bottom of the screen, go to Settings → Staff → select staff → Offered Services → Edit → select service from drop-down menu → Add (or click Remove if you do not want this staff to accept bookings for certain service/s).
2. Now add worktimes for this staff – refer to section Settings → Worktime in this guide.
Waitlists
Waitlist feature requires a Premium plan.
- Setting up a waitlist: Refer to section Booking options in this guide on how to setup waitlists.
- Accessing a waitlist: Refer to section Access your Waitlists in this guide on how to use your waitlist/s to send mass email blasts or to call patients on your waitlist/s.
STEP 5: START MARKETING
Online Booking
- Go to Online Booking → Copy booking link
- Post this link on your website and social media channels.
- Post this link on posters inside your pharmacy, in front of your pharmacy and in your pharmacy windows.
- Update your pharmacy’s phone auto-attendant message and let your patients know they can book online now and include your booking link. If they do not have email or SMS, they can talk to a pharmacist and make an appointment (refer to refer to section Adding an appointment for someone without email in this guide).
- For flu, post your booking link on the Immunize BC Flu Locator. Don’t have a profile setup with Immunize BC Flu Locator? Register for free here. Learn more at BCPhA Flu Resources Page.
STEP 6: MONITOR APPOINTMENTS AND GET FEEDBACK
- You will receive an email each time someone books. Go into appointments to see if patients are correctly entering their information.
- Seeing patients not completing their forms? If there are any issues, contact the patient directly to ask for more information if you need it.
STEP 7: DAILY TASKS
- Login https://b.telehippo.com/r/login
- Print your daily schedule (refer to section Printing your daily schedule in this guide).
- Email or SMS (if your Online Booking Platform subscription has SMS enabled) those who did not complete their COVID-19 pre-screening and/or Vaccine Screening forms (by going to Scheduler, clicking on their appointment and clicking Remind).
- For patients who did not complete the COVID-19 pre-screening online, you may want to call them to confirm they are still coming for the appointment and the time, as well as perform the COVID-19 pre-screen in advance over the phone.
- Review each patient’s screening forms by opening their appointment in Scheduler and note any items you need to discuss with the patient on your printed daily schedule. Or if you choose to print out the Vaccine Screening forms for each patient in advance make notes directly on the form. Open the appointment, click on the box beside the form (it would say Signed if the patient completed the form online). Clicking the box will open the form, edit vaccine information (this box will only appear if the patient completed the form online, see below for more information) and then click Print.
- You can click on Edit Vaccine Info to edit For Pharmacist Use Only section digitally if you choose and then click Submit.
NOTE: The Edit Vaccine Info button will only appear at the top of the form, next to the Print button, if the patient has filled out the form online. Once you fill in the form digitally and save changes your notes will be included in the form. This is an optional feature; some pharmacies may choose to print all the forms in the morning and then have the forms available for the appointments to manually write in the details when the patient is onsite.
Getting Help
Do you have additional questions about how to use your Online Booking Platform? Please feel free to email us at info@bcpharmacy.ca. We would be happy to help with any questions you have.